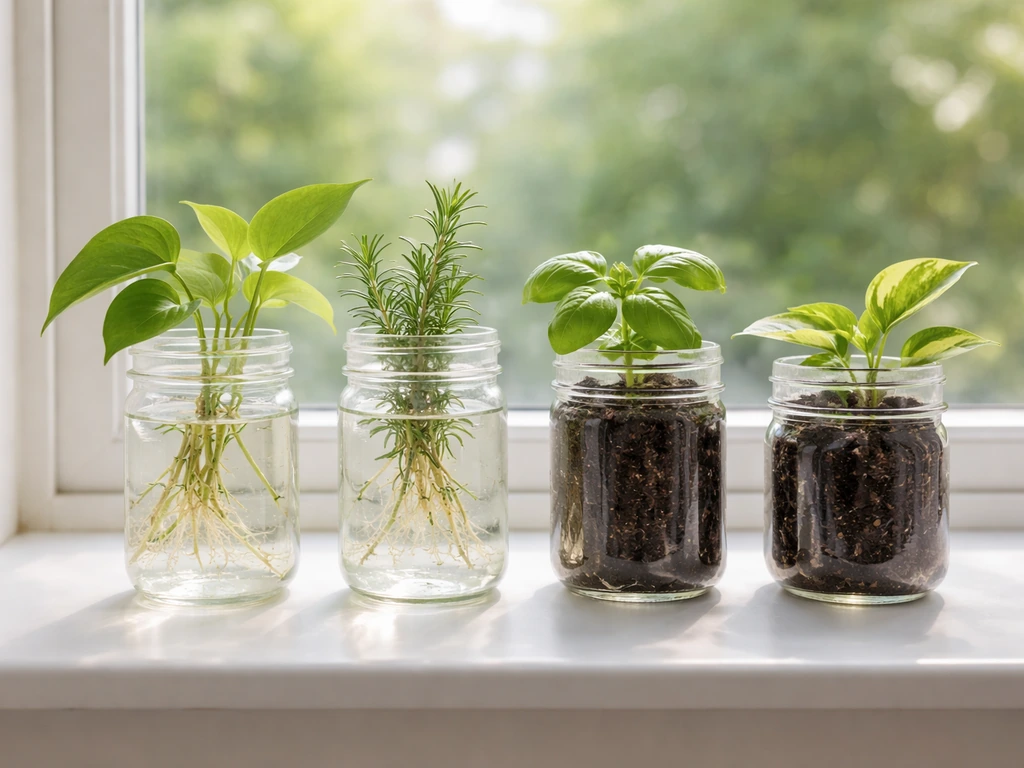
Yes, you can absolutely grow plants in mason jars, and plenty of them thrive there. The best options are herbs like basil, mint, and chives in soil-filled wide-mouth quart jars, water-rooted cuttings of pothos, philodendron, or tradescantia in any clear jar, and sprouting seeds or microgreens using the rinse-and-drain method. The catch is that mason jars have no drainage holes, so your plant choice and setup matter a lot. Get those two things right and mason jars are genuinely one of the most practical, low-cost ways to grow plants on a windowsill.
Best Plants to Grow in Mason Jars: What to Grow
Rachel Hartley
19 Jun 2026
Can you really grow plants in mason jars (and what setup works)
The honest answer is: yes, with one important caveat. Mason jars are glass, which means no drainage holes, limited airflow, and a tendency to stay wetter than a terracotta pot. That single fact rules out a whole category of plants (succulents, cacti, most woody herbs like rosemary) and makes overwatering the number-one killer. But it also opens up some genuinely excellent growing options that actually benefit from the jar's humidity, visibility, and moisture retention. To narrow it down, the best plants to grow in mugs are the ones that fit small, low-drainage containers without staying soggy.
There are three functional setups that work well in mason jars. First is the Kratky-style water growing method, where you suspend a plant's roots in water with an air gap above the waterline so the roots get both moisture and oxygen. For water propagation in a glass vessel, start with a healthy parent plant and use clean, room-temperature (filtered or pre-treated) water to support rooting [use clean, room-temperature (filtered/pre-treated) water](https://www. compostcheck.
com/academy/home-gardening/the-art-of-propagating-houseplants-in-water). Second is soil growing with a drainage layer, where you add about 2 inches of gravel or small stones at the bottom before adding potting mix, which gives excess water somewhere to go besides the root zone. Third is the rinse-and-drain sprouting method, where you germinate seeds in the jar, rinse them a couple of times a day, and drain at a 45-degree angle so they never sit in standing water.
Each method suits different plants, and mixing them up is where people run into trouble. If you want a quick start, you can match these setups to the plants you can grow in a jar for the best results.
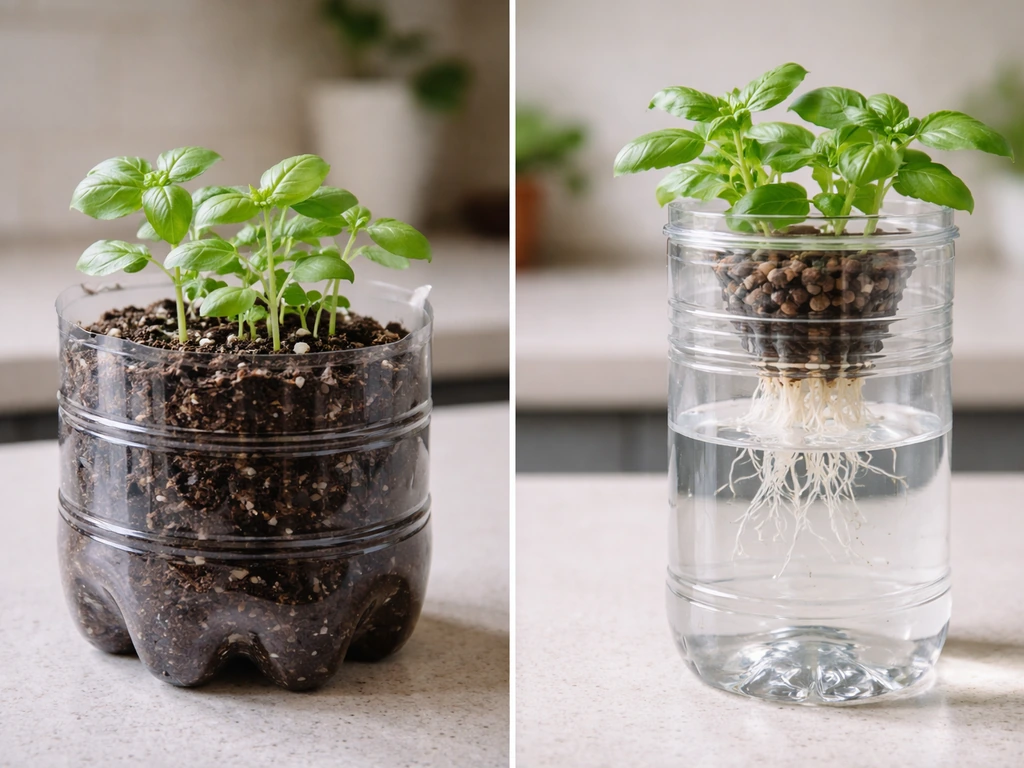
Jar size also matters more than most guides admit. If you want a bigger DIY option beyond mason jars, you can also look at plants that can grow in plastic bottles. A wide-mouth quart jar (about 4 inches across) gives you enough root room for a single herb plant or a water-rooted cutting. Pint jars work fine for sprouting or propagating smaller cuttings but get cramped fast for anything trying to grow long-term. If you're growing herbs for actual kitchen use, go wide-mouth quart or larger every time.
Best mason-jar plants by type: water-rooted vs soil-grown
The two main growing styles suit completely different plant categories, so it helps to decide upfront which route you're taking.
Water-rooted plants (Kratky / propagation jars)
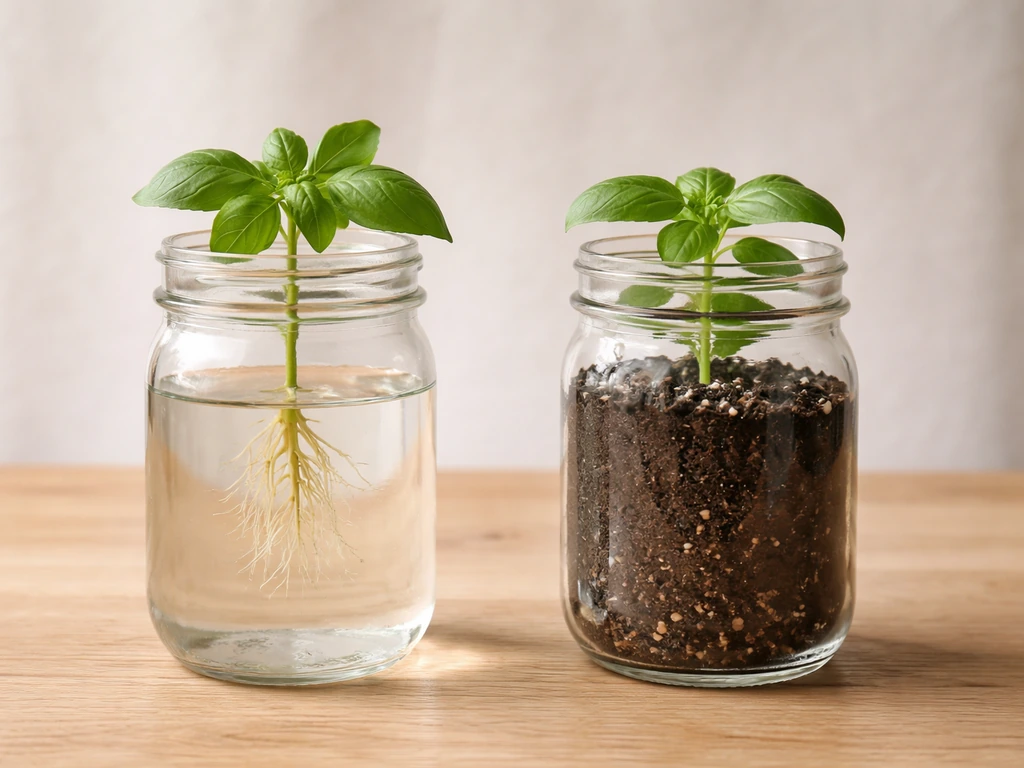
Water growing works best with plants that have soft, herbaceous stems. These root quickly and reliably in water without rotting. The Kratky method (filling the jar once, letting the water level drop naturally to create an air gap) is especially low-effort and works well on a bright windowsill. Good candidates include pothos, philodendron, tradescantia, coleus, sweet potato vine, and green onions (scallions). For edible crops, lettuce and small herbs like basil can be started this way using a small net pot sitting in the jar's mouth to hold growing media above the waterline.
One non-negotiable for water propagation: at least one node (the bump on the stem where leaves or branches emerge) must be submerged. Roots grow from nodes, not from smooth stem sections. Missing the node is probably the most common reason cuttings sit in a jar for weeks and do nothing.
Soil-grown plants (drainage-layer method)
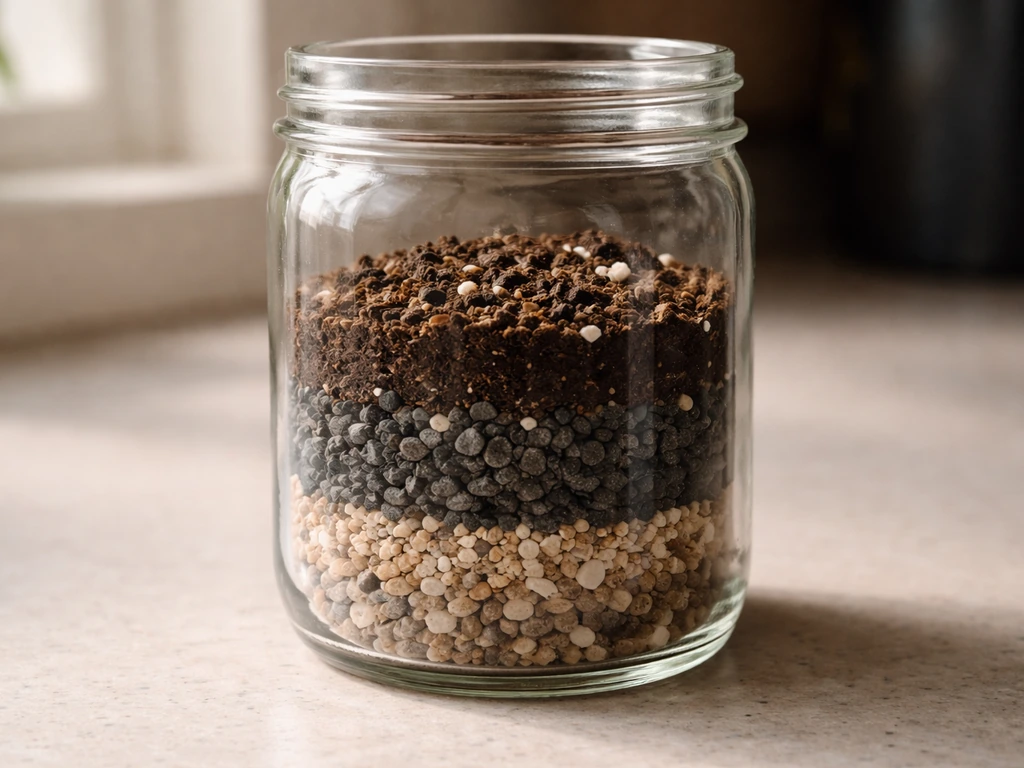
If you want to grow herbs you can actually harvest from, soil is the better path. The key setup step is building a drainage layer before you add any potting mix: roughly 1 inch of fine sand plus 1 to 2 inches of small stones or gravel at the bottom, or a layer of horticultural charcoal between the gravel and soil. This gives excess water somewhere to collect away from the roots.
Best plants for this setup include mint, chives, parsley, cilantro, basil, and small lettuce varieties. If you’re wondering what plants can i grow in a glass bowl, the same drainage-layer idea helps you pick moisture-tolerant options Best plants for this setup include. These are all moisture-tolerant enough to handle the lack of drainage holes as long as you don't overwater.
| Plant | Best method | Jar size | Best for | Difficulty |
|---|---|---|---|---|
| Pothos | Water (Kratky/propagation) | Pint or quart | Low-maintenance, aesthetics | Very easy |
| Mint | Soil with drainage layer | Wide-mouth quart | Edible herb, fast growth | Easy |
| Chives | Soil with drainage layer | Wide-mouth quart | Edible herb, low light OK | Easy |
| Basil | Soil or Kratky water | Wide-mouth quart | Edible herb, warm season | Easy-moderate |
| Tradescantia | Water propagation | Pint | Aesthetics, color, fast root | Very easy |
| Lettuce | Kratky water or soil | Wide-mouth quart | Edible greens, cool season | Easy |
| Green onions | Water (regrowth) | Any jar | Quick edible, minimal setup | Very easy |
| Philodendron | Water propagation | Pint or quart | Low-light aesthetics | Easy |
| Microgreens | Rinse-and-drain (no soil) | Wide-mouth quart | Fast edibles, high nutrition | Easy |
| Sprouts | Rinse-and-drain (no soil) | Wide-mouth quart | Fastest harvest, edible | Very easy |
Top beginner-friendly picks (low risk, forgiving growth)
If you're new to jar growing, start with one of these five. They're forgiving, fast to show results, and genuinely useful. Once you know the setup that fits your space, you can narrow down the best plants to grow in a bottle for your light and watering style.
- Green onion regrowth: Cut store-bought scallions about an inch above the roots, drop them in a jar with an inch of water, and put them on a sunny windowsill. New growth appears in 2 to 3 days. Rinse the jar and change water every couple of days. This is the fastest win in jar gardening.
- Pothos in water: Snip a 4- to 6-inch cutting just below a node, strip the lower leaves, and set it in a jar of room-temperature filtered water. Roots appear in 1 to 2 weeks. Almost impossible to kill and looks great in a clear jar.
- Sprouts (radish, broccoli, or mung bean): Add a tablespoon of seeds to a wide-mouth quart jar with a mesh or cheesecloth lid. Soak 8 hours, then rinse and drain twice daily at a 45-degree angle. Harvest in 3 to 5 days. No soil, no light needed for the first few days.
- Mint: Plant a cutting or small nursery plant in a soil-filled wide-mouth quart jar with a gravel drainage layer. Mint likes moisture and forgives inconsistent watering better than almost any other herb. Put it in a spot with at least 4 hours of indirect light.
- Chives: Start from seed or divide from a clump. Chives are slow to start but extremely tolerant of low light and irregular watering once established, which makes them ideal for a kitchen counter jar.
How to grow plants in a mason jar: step by step
For soil-grown herbs
- Start with a clean wide-mouth quart mason jar. If reusing an old jar, sanitize it with a weak bleach solution, rinse thoroughly, and air dry.
- Add a 2-inch drainage layer: small stones, pea gravel, or marbles. Optionally add a thin layer of activated horticultural charcoal on top of the gravel to reduce odors and slow bacterial growth.
- Fill with quality potting mix to about 1 inch below the rim. Do not use garden soil, which compacts too much in containers.
- Plant your herb, firm the soil gently around the roots, and water until moisture reaches the drainage layer (you can see it through the glass).
- Place in a spot with at least 4 to 6 hours of direct light, or directly under a grow light.
- Water only when the top inch of soil feels dry. The glass lets you watch the moisture level, which is a real advantage. Do not let water pool at the bottom drainage layer for more than a day or two.
For Kratky-style water growing
- Use a wide-mouth quart jar. Place a small net pot (2-inch size fits most quart jar mouths) filled with a growing medium like clay pebbles or rockwool in the opening.
- Fill the jar with water until the level sits about 1/4 inch above the bottom of the net pot. As the plant drinks, the water level drops and creates an air gap. That gap is intentional: the upper roots access oxygen there while lower roots stay in water.
- Add a half-strength liquid nutrient solution if growing edibles like lettuce or basil. Plain water works for propagation.
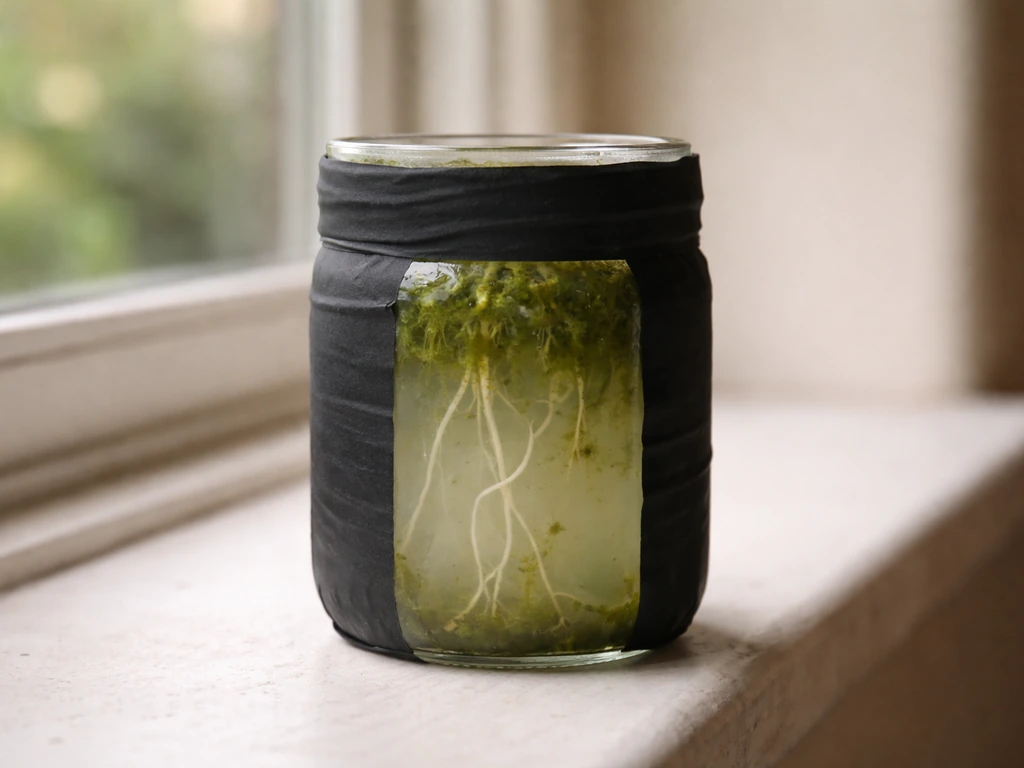
- Wrap the outside of the jar with tape, foil, or fabric to block light from reaching the water. This is critical to prevent algae.
- Set in a spot with 6 or more hours of bright indirect or direct light. Do not top off the water constantly; for true Kratky growing, you fill once at the start and let the gap form naturally.
- Check roots weekly. Healthy water roots are white or pale tan. Brown, slimy, or foul-smelling roots mean rot is starting. If that happens, dump, clean, and restart.
For sprouts and microgreens
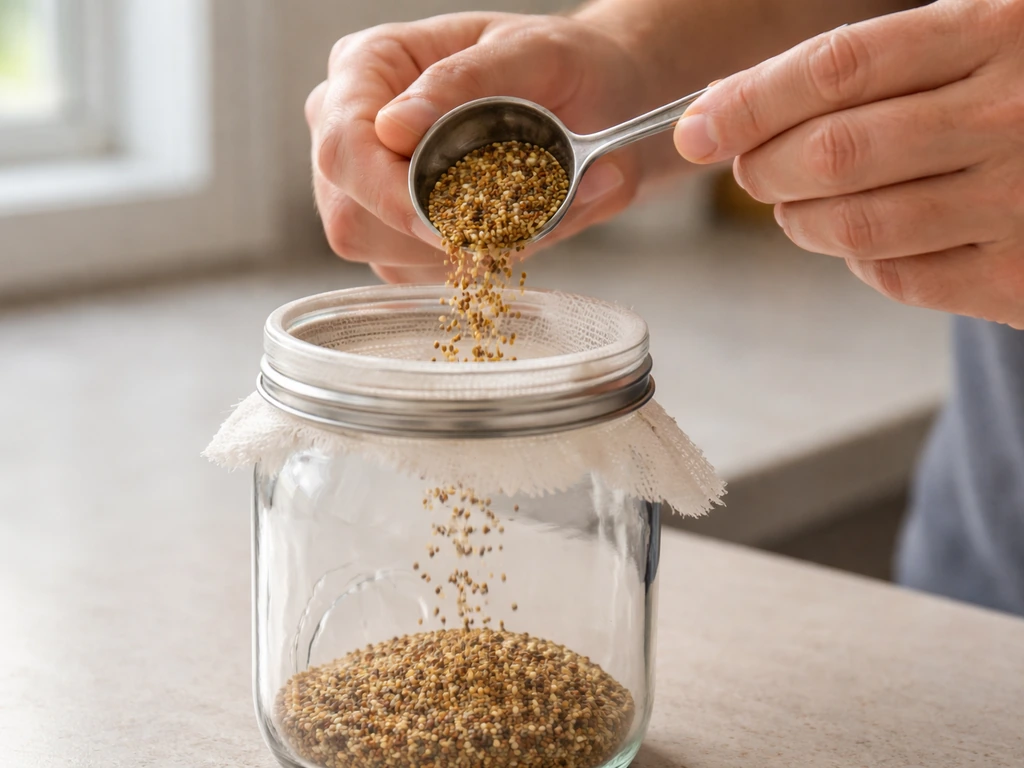
- Add 1 to 2 tablespoons of sprouting seeds (radish, broccoli, mung bean, lentil) to a wide-mouth quart jar.
- Cover with a breathable lid: a piece of cheesecloth or mesh secured with the jar's band works well.
- Soak seeds in water for 8 to 12 hours, then drain completely by tilting the jar at a 45-degree angle for at least 10 minutes.
- Rinse with clean, room-temperature water and drain again twice daily. Stand the jar upside-down at an angle on a rack or dish to let air circulate and excess water drain between rinses.
- Keep out of direct sunlight for the first few days. Move to indirect light once small green leaves appear (if you want chlorophyll to develop).
- Harvest when shoots are 1 to 2 inches long, usually 3 to 5 days for most varieties.
Light, temperature, and seasonal guidance by location
Mason-jar plants grown indoors are mostly shielded from outdoor climate swings, but light and temperature still change significantly by season and region, and they absolutely affect how well your jar garden performs.
In summer in the Northern Hemisphere (right now, mid-June 2026), most windowsills are getting their strongest light of the year. A south- or west-facing window works great for basil, lettuce, and water-grown herbs. For basil, lettuce, and water-grown herbs, you can also consider plants that can grow in glass bottles as a related option for similar indoor glass growing conditions.
One caution: glass amplifies heat, and a jar sitting in direct afternoon sun in a hot climate like Texas, Arizona, or Southern California can heat the water in a Kratky jar to temperatures that cook roots. If your window gets harsh afternoon sun and summer temps above 90°F, move the jar back from the glass or shade it in the afternoon.
In winter, especially in northern zones (Pacific Northwest, Great Lakes, New England), windowsill light drops dramatically. Most herbs need supplemental grow lighting from October through March if you want them to produce rather than just survive. A simple full-spectrum LED strip or bulb 6 to 12 inches above your jars run for 14 to 16 hours a day makes a massive difference. Pothos, philodendron, and tradescantia in water jars are more forgiving of low winter light than edibles.
For growers in the southern US, year-round windowsill growing is very practical. In Florida or coastal California, mint and chives in soil jars can stay productive almost every month. In cooler-climate zones 4 to 6, focus your summer mason-jar effort on basil, which wants warmth and won't tolerate temps below 50°F, and shift to chives, sprouts, and pothos propagation in fall and winter.
Temperature inside the jar matters too. Warm, stable conditions help water propagation and sprouting go faster. Cool kitchen temps (below 60°F) slow root development noticeably in water jars. If your kitchen runs cold, put your propagation jars near (not on top of) a heat source, or on top of the refrigerator where ambient warmth is usually a few degrees higher.
Troubleshooting common mason-jar problems
Algae on the glass and roots
Green or brown slime on the inside of the jar or on water roots is algae, and it's caused by light reaching the water. The fix is simple: block the light. Wrap the outside of the jar with dark tape, kraft paper, a cloth sleeve, or even a paper bag cut to size. If algae has already taken hold, dump the water, scrub the jar with a mild bleach solution, rinse completely, and start fresh with clean water and a newly trimmed cutting. Follow the recommended container sanitation steps that use a weak bleach solution, then rinse with clean water and allow containers to air-dry before reuse. Trying to rehabilitate a heavily algae-covered root system usually just delays the inevitable.
Root rot in soil jars
This is almost always overwatering. The tell is a mushy, dark stem base and a foul smell from the soil. If you catch it early, let the jar dry out completely for several days and cut away any blackened roots before replanting in fresh mix. If the stem base is already soft and black, the plant is gone. Restart with fresh soil and a new plant, and commit to waiting until the top inch of soil is dry before watering again. The drainage layer at the bottom helps, but it doesn't save you from chronically overwatering.
Condensation fogging the glass
Heavy condensation inside a jar with a lid on is normal but manageable. Try leaving the lid off or replacing a solid lid with a loose cover for 24 hours to let moisture escape. If condensation is persistent, it usually means the environment inside the jar is too wet relative to airflow. For soil jars, this often means you've been overwatering. For water jars, some condensation on the inside is fine and doesn't need fixing unless it's so heavy it's blocking light to the plant.
Slow growth or yellowing leaves
In soil jars, slow growth combined with yellowing usually means either not enough light or depleted nutrients. Potting mix in a small jar runs out of nutrients faster than an outdoor container. Add a diluted liquid fertilizer (half the recommended dose) every 2 to 3 weeks once a plant has been in the jar for a month. For water jars, yellowing can mean the plant needs nutrients in the water, especially if you've been using plain tap water for several weeks.
Fungus gnats in soil jars
Fungus gnats love the consistently moist soil in poorly drained jars. Sticky yellow traps catch the adults and help you gauge how bad the infestation is. For the larvae in the soil, let the top layer dry out as much as possible between waterings, and if the problem persists, a diluted hydrogen peroxide drench (1 part 3% hydrogen peroxide to 4 parts water, applied once in place of a regular watering) kills larvae without harming your plant.
Sprouting jars not sprouting (or molding)
Failed sprout jars almost always trace back to inadequate drainage or not rinsing often enough. Standing water at any point in the process causes rot, not sprouting. Make sure the jar is tilting at a steep enough angle (around 45 degrees) after each rinse so all water drains out, and that the mesh lid lets air circulate. If you see mold, dump everything, sanitize the jar, and start over with fresh seeds. Trying to rinse mold off developing sprouts rarely works.
When to scale up: transplanting out of the jar
Mason jars are starter containers, not permanent homes for most plants. You'll know it's time to transplant when roots start circling visibly at the bottom of the jar, growth slows noticeably even with adequate light and feeding, or the plant tips over because it's top-heavy.
For soil-grown herbs, transplanting is straightforward. Water the jar well the day before so the root ball holds together, then gently ease the plant out and move it to a container with drainage holes and fresh potting mix. Handle the root ball without breaking it apart, and water it in immediately after transplanting to reduce shock. Avoid transplanting in the middle of a hot afternoon; early morning or a cloudy day is gentler on the plant.
Water roots are more delicate and need a careful transition to soil. When you move a water-rooted cutting to soil, the roots have adapted to a fully saturated, low-oxygen environment and need time to adjust. Plant the cutting in very moist potting mix, keep it out of direct sun for the first week, and mist the leaves daily to reduce moisture loss while the roots adapt. This gradual acclimatization is much more successful than just dropping a water root directly into dry soil and hoping for the best.
If you're scaling up your jar garden rather than moving a single plant, it's worth exploring what works in other glass and repurposed containers too. The same drainage-layer principles apply whether you're growing in mason jars, other glass bottles, or repurposed containers of different shapes and sizes, so the habits you build with jars transfer directly to a bigger container setup. If you want to scale up beyond jars, the best plants to grow in a greenhouse are often the ones that thrive with consistent warmth, light, and moisture control repurposed containers.
FAQ
Can I grow succulents or cacti in mason jars if I use very little water?
Usually no, because they still need intermittent drying and better airflow than a sealed glass jar provides. If you really want the look, use jar planting only as a decorative sleeve and keep the actual plant in a separate gritty pot with drainage, then remove it for watering and let it drain fully before putting it back.
What kind of lid should I use on mason jars, screw-top or loose?
For sprouting and for reducing condensation, prefer a loose cover (or a sprouting mesh lid) so humid air can exchange. For water jars (like Kratky), a loose fit is fine if you are not creating a sealed environment, but make sure the opening still supports stable light and does not let the water line fluctuate too much.
How do I prevent the water in a Kratky jar from going sour?
Keep the jar out of strong direct light and do not let organic debris accumulate in the water. If you see cloudy water or an off smell, dump and restart with clean water, scrub the jar, and re-trim the cutting back to fresh tissue.
Do I need a net pot or can I grow herbs directly in the jar opening?
A net pot is helpful when you are keeping the growing media above the waterline in water setups, especially for lettuce and small herbs. If you try to cram soil into the jar mouth without drainage, you will quickly recreate the overwatering problem that mason jars are prone to.
What water should I use for water-rooted cuttings, tap or filtered?
Tap water is fine in many homes, but if your tap is very hard or heavily treated, nutrient imbalances can show as yellowing over time. If yellowing persists after a month, switch to filtered water or add a mild nutrient solution to the water at half strength, then monitor weekly.
How often should I refill or change the water in a water-growing mason jar?
If you are using a Kratky-style approach, do not keep topping off to the same level. Instead, allow the water line to drop to create the intended air gap, and only replace water when it becomes visibly cloudy, smells, or light exposure has driven algae growth.
Why do my cuttings rot even though I submerged a node?
Even with the correct node submerged, the stem can rot if the jar traps too much moisture and the water is too warm or light-driven. Trim off any mushy tissue, ensure at least one node is under water but the rest of the stem stays dry above, then restart in clean water with blocked light to prevent algae.
Is there a “safe” limit on how big a plant can get in a quart mason jar?
Most plants do not stay stable long-term, even if they survive. A practical limit is when roots visibly crowd the bottom or when the plant becomes top-heavy and starts leaning or tipping, then transplant promptly into a container with drainage.
Do mason jars work outdoors in summer?
They can, but glass heat gain is the big risk. If you place jars on a patio or in hot sun, move them back from direct afternoon light or shade them, because overheating can cook roots and accelerate algae in water jars.
How can I tell the difference between algae and mold in my jar?
Algae usually looks green or brown and forms on surfaces where light reaches, especially in water jars. Mold is more likely to look fuzzy or patchy and often appears after stagnant wet conditions during sprouting; if you see mold, dump and restart rather than trying to scrub it off from developing sprouts.
What’s the most effective way to troubleshoot overwatering in soil jars?
Look at the stem base and smell first, mushy dark tissue and foul odor point to rot. If it is not fully rotted, let the jar dry until the top inch is dry before watering again, and remove any blackened roots. If the base is already soft, restart with a new plant because recovery is rarely successful.
How do I manage fungus gnats in a mason jar without harming the plant?
The most reliable approach is drying the top layer between waterings and using sticky yellow traps to reduce adults. If larvae persist, a targeted hydrogen peroxide drench applied once (diluted as described in the article body) can help, but avoid repeated heavy doses because jar conditions make root injury more likely.
Can I reuse the same potting mix or jar for another planting?
It is better not to reuse spent soil in jar systems, because it retains moisture and can carry pests and pathogens like fungus gnat eggs. If you reuse the jar, sanitize it thoroughly and switch to fresh potting mix so drainage performance and microbial balance start clean.
Next Article
Plants That Can Grow in Plastic Bottles: Best Picks
Best plants for plastic bottle growing, matched to bottle hydroponics or soil methods with light, water, and setup tips.